Anand Sudhanaboina

Serve Static Pages on S3 Without .html Extension

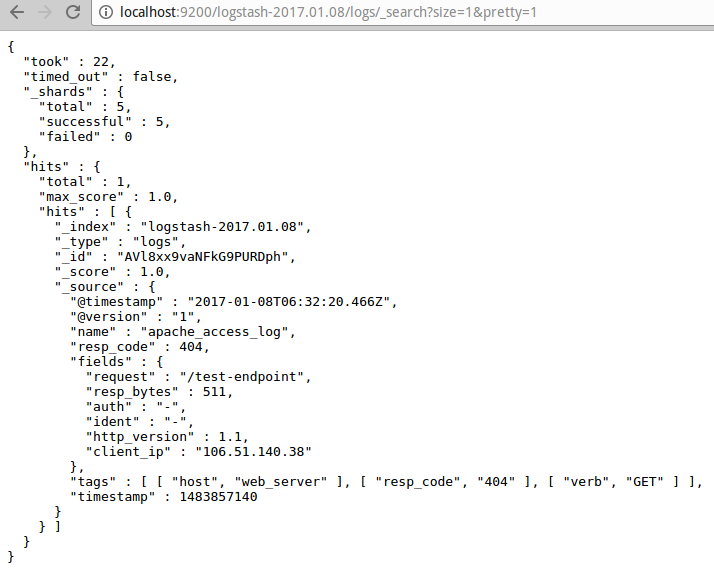
Hosting static HTML pages generated by Jekyll or any other static site generator with pretty permalinks (the one’s without .html) on to S3 would yield into a 404. The reason is that S3 is an object store hence it doesn’t really look up for a .html version of a page’s permalink.

The solution is copying the file to S3 without the .html extension and explicitly setting the content type of the file, for example:

1
aws s3 cp index.html s3://bucket/index --content-type 'text/html'

By this S3 would send the file contents along with the content-type header set to text/html. To scale, I use the below script which automates this:

1
2
3
4
5
6
# In your public or _site directory
aws s3 cp ./ s3://bucket/ --recursive --exclude "*.html"

for file in $(find . -name '*.html' | sed 's|^\./||'); do
    aws s3 cp ${file%} s3://bucket/${file%.*} --content-type 'text/html'
done

Here’s what it does:

  1. Push all the files to S3 excluding all .html files
  2. Iterate all the .html files and push them to S3 without the extension and with content-type

S3 CNAME SSL With CloudFlare

AWS doesn’t allow CNAME SSL with static hosting on S3. The only AWS native option is to create a Amazon CloudFront distribution which supports CNAME SSL (AWS ACM or Custom). However, if you happen to or can use CLoudFlare you can do it without the overhead of CloudFront and the cost that comes with it. This however doesn’t offer the capablities which CloudFront provides. Here’s how to do it:

Enable S3 for web hosting

Create a S3 distribution with bucket name same as your domain name. Once you do this, enable static web hosting for the bucket, try to access the bucket using the public link (If you get 403, refer this).

CloudFlare setup

In the CloudFlare DNS dashboard add a CNAME record to the bucket host (where you accessed the bucket in previous step), now you should be able to access the bucket with your cname. Try using https, if it works you’re setup is done here, you may want to add a page rule in CloudFlare if you wish to have https only access to the site.

If HTTPS fails, try to check the SSL mode of the CloudFlare account, unless you have Flexible SSL this setup won’t work. Now, can you safely change SSL to flexible or if you want to keep it to Full and want flexible to a paricular sub domain, like me, add a page rule like shown below which will only apply flexible SSL onto a paticular domain.

My page rules for this setup looks like this, one for force https another for flexible SSL:

Launch Random Chrome Instances Faster

Multiple instances of Chrome can be spun by creating profiles. While working on my new Chrome extension pin tabs, I found a need to launch new chrome instances to test a few things. Problem with profiles is that Chrome saves them, i.e; you need to delete profiles which you don’t need later on, this might get messy if you have quite a many. Here’s a quick and simple way to launch and auto-kill chrome instances:

1
2
3
4
5
6
function launch-chrome-new-profile(){
  hash=$(head /dev/urandom | tr -dc A-Za-z0-9 | head -c 32 ; echo '')
  google-chrome --user-data-dir=/tmp/chrome-instances/$hash -no-first-run
  rm -rf /tmp/chrome-instances/$hash
  unset hash
}

launch-chrome-new-profile will launch a new chrome instance with data dir /tmp/chrome-instances/$hash with a random hash, once you close this instance the data dir will be auto-deleted.

Streamline Log Analysis & Analytics

Unified logging is essential when you are scaling your application, this helps in grouping the logs on component (service) level and also providing search capability on multiple services, for example: assume that you have a subscription service which have two internal SOA services, payment service and web service, if the logs are scattered and also assuming that these services are horizontally scaled you will be having hard time to debug these logs, instead if you have unified logging in place, a search on unique indentifier will get the results from all the services, this helps us in quick resolution with less effort. This article will demonstrate a POC which is built using multiple FOSS and with zero custom code to streamline unified logging. Alternatively you might be interested in having a look at Loggly, Sumo Logic and Splunk

FOSS used:

Architecture design:

Working mechanism overview:

  1. Telegraf running on VM instances will push logs to Kafka
  2. Logstash will:
    • Read data from Kafka
    • Modify data if required
    • Presist data to ElasticSearch
  3. Grafana and / or Kibana will read fetch data from ES based on the queries

In this example I’m using Apache access logs as my source.

Step 1: Setup Telegraf:

Download and install Telegraf if you don’t have one running.

Below is the config which you need to add to telegraf.conf (/etc/telegraf/telegraf.conf):

Log parser input plugin config:

1
2
3
4
5
6
7
8
9
[[inputs.logparser]]
  ## files to tail.
  files = ["/var/log/apache2/access.log"]
  ## Read file from beginning.
  from_beginning = true
  name_override = "apache_access_log"
  ## For parsing logstash-style "grok" patterns:
  [inputs.logparser.grok]
    patterns = ["%{COMMON_LOG_FORMAT}"]

Kafka output plugin config:

1
2
3
4
5
6
7
[[outputs.kafka]]
  brokers = ["localhost:9092"]
  topic = "logparse"
  compression_codec = 0
  required_acks = -1
  max_retry = 5
  data_format = "json"

If you are not using Telegraf before and just want to test this out, use this (telegraf.conf) config file.

Step 3: Setup Kafka:

Download and start Kafka if you don’t have one running

Create a Kafka topic using the command:

1
bin/kafka-topics.sh --create --topic logparse --zookeeper localhost:2181 --partitions 1 --replication-factor 1

Feel free to change the Kafka topic, partitions and replication according to your needs, for example: topics logs-web, logs-payments can be used with different partitions and avaliablity.

Step 4: Setup ElasticSearch:

Download and start ElasticSearch

Step 4: Setup Logstash

For now, I want to analyse the HTTP response codes hence I changed the logstash config accordingly, below is the config:

1
2
3
4
5
6
7
8
9
10
11
12
13
14
15
16
17
18
19
20
21
22
23
24
input {
  kafka {
      topics => ['logparse']
  }
}

output {
  elasticsearch {
      codec => 'json'
  }
}

filter {
  json {
      source => 'message'
      remove_field => ['message']
  }
  mutate {
      add_field => {"resp_code" => "%{[tags][1][1]}"}
      }
      mutate {
          convert => { "resp_code" => "integer" }
      }
}

Save this config to a file (logstash-test.yml) and start the logstash:

1
bin/logstash -f config/logstash-test.yml

References:

Step 5: Test the flow

Start the telegraf using the command telegraf and make random HTTP requests to the Apache server and see if the data is being presisted to ES.

Here are a few resources:

If everything goes as expected these are a few thing which you should be seeing:

Telegraf writing to Kafka:

Data in ES:

Step 6: Setup Grafana:

  • Install and start Grafana
  • Add ES as data source in Grafana
  • Add charts and queries
  • Below is my Grafana board with monitoring of status codes 200 & 400 (Looks good if you have more data):

For Kibana, download and start Kibana, and then add ES as data source and execute queries.

Backup of Dot Files Using Python & Dropbox

For developers who have 100’s of lines in multiple dot files, backing them up is also important, I’ve seen quite a few developers who copy the files to git or explicitly sync them. This works just fine, but it’s a manual process and duplication of data. I have multiple dot files (shell files, config files, etc) and I wanted a continuous backup solution which need’s zero manual effort.

Update: 2-8-2017

I experimented with Dropbox offical client, which found to be way easier than writing code using Dropbox’s API.

1
2
3
4
5
# Download latest dropbox client and start the client:
wget -O - "https://www.dropbox.com/download?plat=lnx.x86_64" | tar xzf -
cd .dropbox-dist
./dropboxd
# Login to your dropbox folder

After the Dropbox client is up and running, create symbolic links of the directory and file you like to backup, example:

1
2
3
# optional: cd into dropbox folder
ln -s /etc/apache2/sites-enabled/000-default.conf 000-default.conf
ln -s ~/.bashrc .bashrc

Dropbox will backup the actual files / directories to Dropbox.

Outdated

Below is the Python code which uses Dropbox Python API to push files to Dropbox:

1
2
3
4
5
6
7
8
9
10
11
12
13
14
15
16
17
18
19
20
21
22
23
24
25
26
27
28
29
30
31
32
 #!/usr/bin/env python
import dropbox, logging

# Constants Config:
ACCESS_TOKEN = "[YOUR_DROPBOX_ACCESS_TOKEN]"
LOG_FILE = "/var/www/html/backup-to-dropbox/backup2dropbox.log.txt"

# Login Config:
logging.basicConfig(filename=LOG_FILE,level=logging.DEBUG, format='%(asctime)s - %(levelname)s - %(message)s', datefmt='%Y-%m-%d %H:%M:%S')
logger = logging.getLogger()
logger.info("Starting process!")

# Get dropbox client instance:
client = dropbox.client.DropboxClient(ACCESS_TOKEN)

# File to backup:
files = [{
  "local" : "/home/anand/.zshcrc",
  "remote" : "zshcrc.txt"
},{
  "local" : "/home/anand/.shcommons",
  "remote" : "shcommons.txt"
}]

for file in files:
  logger.info("Uploading: " + file['local'])
  try:
      f = open(file['local'], 'rb')
      response = client.put_file(file['remote'], f, overwrite=True)
      logger.info(response)
  except Exception as e:
      logger.error(e)

Click here - To create a new app and get the Dropbox access token.

When this Python files is executed it will try to push the set of files in files variable and you can see these in Dropbox app folder which you created. local property in files variable is the local file location, remote is the remote file name.

To automate this process, add the cron expression 0 * * * * /use/bin/python dropbox_backup.py in cron tab editor (crontab -e). This will execute the Python script every one hour and pushes the files to Dropbox, however Dropbox client will only update the file in Dropbox if that’s a modified version of the existing file in Dropbox.

Network Performance Analysis Using CURL

curl can be handy tool to perform network analysis.

1
curl -o /dev/null  -s -w "%{time_total}" http://anands.github.io

This will print the total time in seconds that the full operation lasted.

Used flags in this command:

  1. -o: This is used to write output to specified destination, as we are focused on just performance we are writing to /dev/null so the stdout of curl will be ignored.

  2. -s: Meant for silent, this will skip the debug table (in which you can see some stats as well).

  3. -w: This commad defines what to display on stdout after a completed and successful operation. The desired output can be formatted using file or in-inline.

You can see entire curl doc (supported variables, etc) for -w flag here

Custom formatting:

We can feed in the desired format using a file or in-inline, in-inline examples:

1
2
curl -o /dev/null  -s -w "%{time_total}" http://anands.github.io
curl -o /dev/null  -s -w "Total Time: %{time_total}\nDownload Speed: %{speed_download}" http://anands.github.io

To read from a particular file you need to specify it as “@filename”, example:

1
curl -w "@format.txt" -o /dev/null -s http://anands.github.io/

I used this to log the info in json format, and here’s how my format.txt looks like:

1
2
3
4
5
6
7
8
9
10
11
12
{
  "http_code" : "%{http_code}",
  "num_connects" : "%{num_connects}",
  "remote_ip" : "%{remote_ip}",
  "remote_port" : "%{remote_port}",
  "size_download" : "%{size_download}",
  "size_header" : "%{size_header}",
  "time_connect" : "%{time_connect}",
  "time_pretransfer" : "%{time_pretransfer}",
  "time_starttransfer" : "%{time_starttransfer}",
  "time_total" : "%{time_total}"
}

Sample output:

1
2
3
4
5
6
7
8
9
10
11
12
13
curl -w "@format.json" -o /dev/null -s http://anands.github.io/ | python -m json.tool
{
    "http_code": "200",
    "num_connects": "1",
    "remote_ip": "192.30.252.154",
    "remote_port": "80",
    "size_download": "7876",
    "size_header": "358",
    "time_connect": "0.032",
    "time_pretransfer": "0.032",
    "time_starttransfer": "1.113",
    "time_total": "1.119"
}

For constant monitoring, create a cron job which runs this command every minute and push data to desired systems.

Distributed Log Search Using GNU Parallel

GNU parallel is a shell tool for executing jobs in parallel using one or more computers. If you have a set of servers to ssh into and run a command in parallel, this tool will help you.

Assuming you have an architecture where several cloud instances are behind LB, but doesn’t have a centralized logging sync (Logging into a centralized server or service, like Splunk):

architecture

If you need to search the log files across all the servers with one command, GNU Parallel comes very handy saving a lot of time. Here’s how it works:

  1. Install GNU Parallel. (Below command for Ubuntu)

    sudo apt-get install parallel

  2. Run the tool:

    echo “command” | parallel –onall –slf servers.txt

A few other way to run the command:

  • echo “fgrep -Rl /var/log/” | parallel –onall –slf servers.txt
  • echo “grep ~/log.txt” | parallel –onall –slf servers.txt

Reddit's Ranking Algorithm

I was curious on how Reddit ranks the front page posts in the “hot” section. I explored it and found a few interesting things.

Reddit decides the front (hot) page posts by three factors:

  1. Up Votes
  2. Down Votes
  3. Posted Date

This is the Reddit’s algorithm for hot posts: explanation

1
2
3
4
5
6
7
8
9
10
11
12
13
14
15
16
17
18
19
20
21
22
23
24
25
26
27
28
29
30
from math import log10, sqrt
from datetime import datetime, timedelta

epoch = datetime(1970, 1, 1)

def epoch_seconds(date):
    """Returns the number of seconds from the epoch to date. Should
       match the number returned by the equivalent function in
       postgres."""
    td = date - epoch
    return td.days * 86400 + td.seconds + (float(td.microseconds) / 1000000)

def score(ups, downs):
    return ups - downs

def hot(ups, downs, date):
    return _hot(ups, downs, epoch_seconds(date))

def _hot(ups, downs, date):
    """The hot formula. Should match the equivalent function in postgres."""
    s = score(ups, downs)
    order = log10(max(abs(s), 1))
    if s > 0:
        sign = 1
    elif s < 0:
        sign = -1
    else:
        sign = 0
    seconds = date - 1134028003
    return round(sign * order + seconds / 45000, 7)

This seems very exciting, so I’ve decided to use Reddit search api to get the JSON of a day’s data, then run the algorithm with the data and see if i can see the same front page of the Reddit. Entire day’s data would be huge so I’ve decided to go with a subreddit, I choose /r/technology. I have the JSON data using Reddit search API and taken a screenshot of /r/technology to compare the results.

Now I have 3 things:

  1. Reddit ranking algorithm
  2. Data of /r/technology for a day (sorted based on posted date)
  3. Screenshot of /r/technology to compare with generated results

I’ve written a python script to do the job.

1
2
3
4
5
6
7
8
9
10
11
12
13
14
15
16
17
18
19
20
21
22
23
24
25
26
27
28
29
30
31
32
33
34
from reddit import *
import json

# Load the data:
posts = False
with open("data.json") as file:
    posts = json.load(file)

# Out JSON variable:
outJson = []

# Iterate and claculate the hot score:
for children in posts:
    for post in children:
        downs = post["data"]["downs"]
        ups = post["data"]["ups"]
        title = post["data"]["title"]
        created = datetime.fromtimestamp(int(post["data"]["created"]))
        hotScore = hot(ups, downs, created)
        out = {}
        out["title"] = title
        out["hotScore"] = hotScore
        outJson.append(out)

# Sort based on hotScore
def sortScore(json):
    try:
        return int(json['hotScore'])
    except KeyError:
        return 0
outJson.sort(key=sortScore, reverse=True)

# Print JSON of top 25 posts:
print json.dumps(outJson[0:25])

But there is one big challenge, Reddit does not reveal the no of down votes, neither in website nor API, so the generated results match closely but not exactly with the screenshot.

Now I have 25 hot posts generated by algorithm based on the input data. Out of these 25, 22 matched with the screenshot but not exactly at the same position, this is due to the mismatch of the downvotes.

Outlier Detection Using Python

Before writing code I would like to emphasize the difference between anomaly and a outlier:

  • Outlier: Legitimate data point that’s far away from the mean or median in a distribution.
  • Anomaly: Illegitimate data point that’s generated by a different process than whatever generated the rest of the data.

Outlier detection varies between single dataset and multiple datasets. In single dataset outlier detection we figure out the outliers within the dataset. We can do this by using two methods, Median Absolute Deviation (MAD) and Standard deviation (SD). Though MAD and SD give different results they are intended to do the same work. I’m not explaining the mathematical expressions as you can find them from wikipedia.

Let’s consider a sample dataset:

dataset

I’ve written a Python script using numpy library, this script calculates both MAD and SD:

1
2
3
4
5
6
7
8
9
10
11
12
13
14
15
16
from __future__ import division
import numpy

# Sample Dataset
x = [10, 9, 13, 14, 15,8, 9, 10, 11, 12, 9, 0, 8, 8, 25,9,11,10]

# Median absolute deviation
def mad(data, axis=None):
    return numpy.mean(numpy.abs(data - numpy.mean(data, axis)), axis)
_mad = numpy.abs(x - numpy.median(x)) / mad(x)

# Standard deviation
_sd = numpy.abs(x - numpy.mean(x)) / numpy.std(x)

print _mad
print _sd

Let’s visualize the output:

visualize

It’s clear that we’ve detected a spike if there is a change in the dataset. After comparing results of several datasets I would like to mention MAD is more sensitive when compared to SD, but more computing intensive. I’ve experimented the same code with 1 M data points, SD performed near to 2x when compared with MAD.

mad-sd

Multiple dataset outlier detection: In this we figure out anomaly in different datasets when compared with target dataset. For example, say you have data of your web site traffic on hourly basis for 10 days including today, and you would like to figure out if there is an outlier in today’s data when compared with other 9 days data. I’ve done this using Mahalanobis distance algorithm and implemented using Python with numpy.

Let’s consider sample dataset:

multiple-dataset

The highlighted path is the target dataset.Let’s feed this to the algorithm:

1
2
3
4
5
6
7
8
9
10
11
12
13
14
15
16
17
18
19
20
21
22
23
24
25
from __future__ import division
import numpy as np

# Base dataset
dataset = np.array(
        [
          [9,9,10,11,12,13,14,15,16,17,18,19,18,17,11,10,8,7,8],
          [8,6,10,13,12,11,12,12,13,14,1,16,20,21,19,18,11,5,5],
        ])

# target: dataset to be compared
target = [0,0,0,0,10,9,15,11,15,17,13,14,18,17,14,22,11,5,5]

# Avg of SD of each dataset
dataset_std = dataset.std()

# Avg of arrays in dataset
dataset_sum_avg = np.array([0] * len(dataset[0])) # Create a empty dataset
for data in dataset:
    dataset_sum_avg = dataset_sum_avg + ( data / len(dataset)) # Add up all datapoints of dataset

# Substract the target dataset with avg of datapoints sum and divide by SD
data = np.abs(target - dataset_sum_avg) / dataset_std

print data

This gives us the outliers, on visualizing the result we get:

image

If you have a look on the data we fed into the algorithm it’s clear that we are able to detect the outliers for today’s input when compared to other x days.

Feel free to explore are a few other algorithms Cosine similarity, Sørensen–Dice coefficient, Jaccard index, SimRank and others.

Remote Logging With Python

Debugging logs can be formidable task if you run same service on multiple production loads with local logging behind a load balancer, you are only left one option, ssh into different servers and then debug the logs.

Logging to a single server from multiple servers can simply debugging, Python provides a in built functionality for logging, by just adding a few lines to the logging config you will be able to send the log to a remote server and then your remote server need to handle this request. In remote server you can store this logs into flat files or NoSQL

A rudimentary architecture would be:

architecture

I’ve created a few code samples to get this done:

Configure a HTTPHandler to the logging handler to send logs to remote server instead of local tty:

1
2
3
4
5
6
7
8
9
10
11
12
13
import logging
import logging.handlers
logger = logging.getLogger('Synchronous Logging')
http_handler = logging.handlers.HTTPHandler(
    '127.0.0.1:3000',
    '/log',
    method='POST',
)
logger.addHandler(http_handler)

# Log messages:
logger.warn('Hey log a warning')
logger.error("Hey log a error")

On the logging server, I’ve created a simple flask application which can handle a post request:

1
2
3
4
5
6
7
8
9
10
11
12
from flask import Flask, request
import json

app = Flask(__name__)

@app.route('/log',methods=['POST'])
def index():
  print json.dumps(request.form)
  return ""

if __name__ == '__main__':
  app.run(host='0.0.0.0', port = 3000, debug=True)

Assuming the server is up and you send a log request, this is how the log structure looks:

1
2
3
4
5
6
7
8
9
10
11
12
13
14
15
16
17
18
19
20
21
{
    "relativeCreated": "52.1631240845",
    "process": "10204",
    "args": "()",
    "module": "km",
    "funcName": "<module>",
    "exc_text": "None",
    "name": "Synchronous Logging",
    "thread": "139819818469184",
    "created": "1446532937.04",
    "threadName": "MainThread",
    "msecs": "37.367105484",
    "filename": "km.py",
    "levelno": "40",
    "processName": "MainProcess",
    "pathname": "km.py",
    "lineno": "13",
    "msg": "Hey log a error",
    "exc_info": "None",
    "levelname": "ERROR"
}

Important properties of this structure would be msg, name & level. Property name is what you pass to getLogger function, and level would the level of logging (error = 40, warning = 30, etc).

This approach is synchronized, if you want logging to be async use threads:

1
2
3
4
5
6
7
8
9
10
11
import logging, thread, time
import logging.handlers
logger = logging.getLogger('Asynchronous Logging') # Name
http_handler = logging.handlers.HTTPHandler(
    '127.0.0.1:3000',
    '/log',
    method='POST',
)
logger.addHandler(http_handler)
thread.start_new_thread( logger.error, ("Log error",))
time.sleep(1) # Just to keep main thread alive.

By this way we need not bother about storage of application server (If you are not storing any data to FS then logs would be the only thing) and debugging would be easy.

Save to mongo to perform analytics and / or to perform quick queries:

1
2
3
4
5
6
7
8
9
10
11
12
13
14
15
16
17
18
19
20
21
from flask import Flask, request
import json
from pymongo import MongoClient

app = Flask(__name__)

# Mongo setup:
client = MongoClient()
db = client['logs']
collection = db['testlog']

@app.route('/log',methods=['POST'])
def index():
  # Convert form POST object into a representation suitable for mongodb
  data = json.loads(json.dumps(request.form))
  response = collection.insert_one(data)
  print response.inserted_id
  return ""

if __name__ == '__main__':
  app.run(host='0.0.0.0', port = 3000, debug=True)